10.4. Timed Exams
This topic describes how to add and manage timed exams in your course.
10.4.1. Overview
You can configure a subsection in your course so that learners have a set amount of time to complete and submit all problems in that subsection.
If a learner goes over the time limit you set, she can no longer submit answers to problems in that subsection. The learner does not receive points for unsubmitted problems.
Course teams can grant individual learners more time to complete problems in the subsection.
Note
Although you can configure an ungraded subsection to be timed, typically you would set a time limit on graded subsections, such as for mid-term or final exams.
10.4.2. Enable Timed Exams
To enable timed exams in your course, follow these steps.
- In Studio, select Settings, then select Advanced Settings.
- Locate the Enable Timed Exams field. The default value is
false. - Change the value of the setting to
true. - Select Save Changes. You can now create timed exams in your course.
10.4.3. Set a Subsection to be Timed
Ensure that you have enabled timed exams in the course. Then follow these steps.
Add and develop a subsection as you would any other subsection.
Select the Configure icon for the subsection.
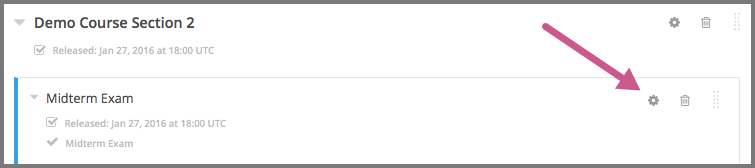
The Settings dialog box opens to the Basic tab.
In the Grading section, set the assignment type and due date for the subsection.
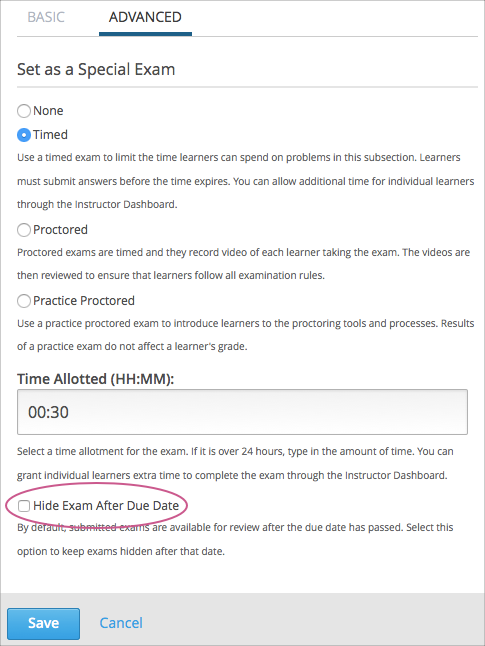
Select the Advanced tab.
In the Set as a Special Exam section, select Timed.
In the Time Allotted field, enter the length of time that you want learners to have to complete the problems in the subsection. Enter the time as HH:MM, where HH is hours and MM is minutes.
Select Save.
10.4.4. Grant Learners More Time for a Timed Exam
From the instructor dashboard, a course team member can grant a learner extra time to complete a timed exam.
View the live version of your course.
Select Instructor, and then select Special Exams.
Expand the Allowance Section.
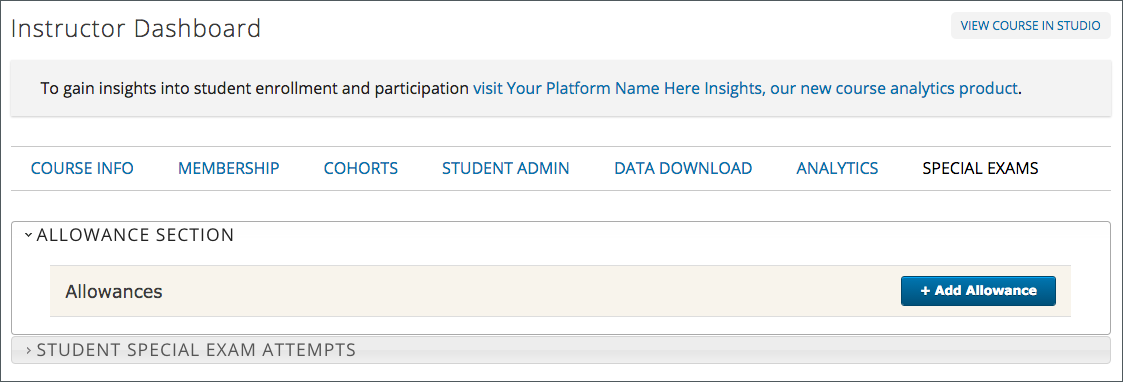
Select Add Allowance.
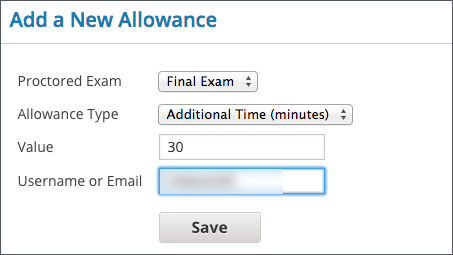
Select the subsection that contains the timed exam.
For Allowance Type, select Additional Time (minutes).
In the Value field, enter the number of extra minutes that you are granting the learner.
Note
Enter a whole number greater than 0.
Enter the learner’s Username or Email.
Select Save.
10.4.5. Hide a Timed Exam After Its Due Date
Timed exams are hidden from learners after they complete and submit their exams, but are available again for viewing after the exam due date has passed. You can configure a timed exam to remain hidden even after the exam due date has passed.
When you keep a timed exam hidden after its due date, learners cannot see the content of the exam, but the grades that they received on the exam are not affected, and their scores for the exam remain visible on the Progress page.
Note
This setting applies only to timed exams. It has no effect on other types of special exams, including proctored or practice exams.
In Studio, select the Configure icon for the timed exam (subsection) that you want to configure.
The Settings dialog box opens to the Basic tab.
Select the Advanced tab.
In the Set as a Special Exam section, make sure Timed is selected.
Select Hide Exam After Due Date.
Select Save.