8.47. Zooming Image Tool
Note
EdX offers full support for this tool.
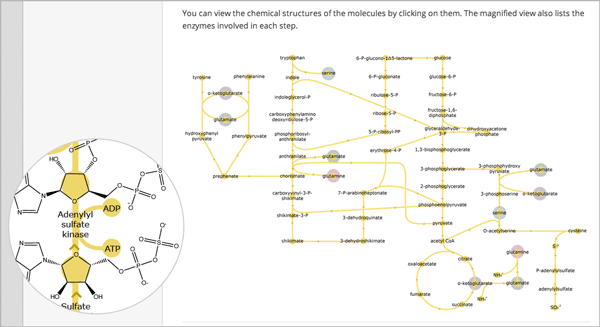
You can present information to your learners with an image. If your image is very large or very detailed, learners might not be able to see all the information in the image. You can use the zooming image tool to enlarge areas of your image as the learner moves the mouse over the image, as in the example below.
8.47.1. Components of a Zooming Image Tool
To create a zooming image tool, you need the following files.
- The image that you want learners to see when they access the unit.
- The image that appears in the magnified area when a learner clicks the regular image. This image can be larger than the regular image.
- The jquery.loupeAndLightbox.js JavaScript file. Every zooming image tool uses this JavaScript file, and you do not need to make any changes to it. To download this file, right-click http://files.edx.org/jquery.loupeAndLightbox.js, and then select Save Link As to save the file on your computer.
8.47.2. Create a Zooming Image Tool
Upload your regular-sized image file, your small image file, and the
jquery.loupeAndLightbox.jsfile to the Files & Uploads page. For more information about how to do this, see Adding Files to a Course.Under Add New Component, select HTML, and then select Zooming Image Tool.
In the new component that appears, select Edit.
In the component editor, replace the default problem text with your own text.
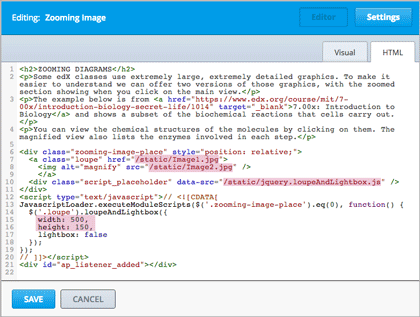
Select HTML from the toolbar to edit the HTML source code.
Scroll down in the file, and then replace the following placeholders with your own content.
Replace the following file name and path with the name and path of the image that you want to appear magnified when the user hovers over the regular image.
https://studio.edx.org/c4x/edX/DemoX/asset/pathways_detail_01.pngFor example, your file name and path might be
/static/Image1.jpg.Replace the following file name and path with the name and path of the image that you want to appear when the page opens.
https://studio.edx.org/c4x/edX/DemoX/asset/pathways_overview_01.pngFor example, your file name and path might be
/static/Image2.jpg.Replace the following name and file path with the name and path of the JavaScript file for your course.
https://studio.edx.org/c4x/edX/DemoX/asset/jquery.loupeAndLightbox.jsBecause you uploaded the
jquery.loupeAndLightbox.jsfile to the Files & Uploads page, your file name and path is/static/jquery.loupeAndLightbox.js.(Optional) If you want the magnified area to be larger or smaller, change the
widthandheightvalues from 350 to larger or smaller numbers. For example, you can change both numbers to 450. Or, if you want a horizontal oval instead of a circle, you can change thewidthvalue to a number such as 500 and theheightvalue to a number such as 150.
The HTML in your zooming image tool might resemble the following.
Select Save.