8.46. 사용자정의 Python 계산 문제
주석
K-MOOC은 이 도구에 대해 부분적인 지원을 제공한다.
다음 장은 문제 구성요소에서 맞춤형 Python 평가 채점기를 활용하는 법에 대해 다룬다.
8.46.1. 개관
맞춤형 Python 평가 입력(혹은 “write-your-own-grader(직접 채점하기?)” 문제)에서, 채점자가 학습자의 응답을 평가하거나 힌트를 제공하기 위해 문제에 Python 스크립트를 만들어서 넣을 수 있다. Python 스크립트가 사용된 문제는 어떠한 유형이든 가능하다. 맞춤형 Python 평가 입력 문제이 많이 이용되는 것은 수식 입력 및 텍스트 입력 문제이다.
맞춤형 Python 평가 입력 문제는 다음을 포함할 수 있다.
8.46.2. 사용자 정의 Python 계산 문제 생성하기
- 문제를 생성하고자 하는 학습 활동에서 신규 구성요소 추가 의 문제 를 클릭한 후 고급 탭을 클릭한다.
- 맞춤형 Python 평가 입력(Custom Python-Evaluated Input) 을 클릭한다.
- 구성요소가 표시되면 편집 을 클릭한다.
- 구성요소 편집기에서 스크립트 태그 포맷 의 문제를 편집한다.
- 저장 을 클릭한다.
8.46.3. 스크립트 태그 포맷
스크립트 태그 포맷은 <script> 태그 안에서 “check function” 을 포함하는 Python 스크립트를 둘러싼다. 또, <customresponse> 태그의 cfn 속성을 추가하여 해당 함수를 참조한다.
다음 장은 <script> 태그를 사용하는 방법에 대해 다룬다.
8.46.3.1. check 함수
check 함수는 두 가지 인자(argument)를 수용한다.
expect<customresponse>의expect속성값. (규정된 경우).expect속성값이 없다면 정답을 판별할 다른 방식이 필요하다.answer.- 문제에 단 1개의 응답 필드가 있는 경우, 학습자가 제공하는 답의 값.
- 문제에 복수의 응답 필드가 있는 경우, 학습자가 제공하는 답의 순서 목록.
check함수는 다음 항목 중 어떤 값이라도 다시 되돌려서 학습자의 답이 옳은지 여부를 나타낸다.
True: 학습자가 모든 응답 필드에 옳게 답했음을 나타낸다.False: 학습자가 옳지 않게 답했음을 나타낸다. 모든 응답 필드가 옳지 않음으로 표시된다."Partial": 학습자의 정답이 일부만 옳았다는 것을 나타낸다. 기본 설정으로 학습자는 문제 총점의 50%를 획득한다. 자세한 사항은 절반 점수 부여하기 를 참고하면 된다.형태(form) 라이브러리 :
{ 'ok': True, 'msg': 'Message' }ok에 대한 라이브러리값이True로 설정된 경우 모든 응답 필드가 옳음으로 표시된다. 같은 값이False로 설정된 경우 모든 응답 필드가 옳지 않음으로 표시된다.msg는 모든 응답 필드 아래에 표시되며 XHTML 마크업을 포함할 수 있다.형태 라이브러리
{ 'overall_message': 'Overall message',
    'input_list': [
        { 'ok': True, 'msg': 'Feedback for input 1'},
        { 'ok': False, 'msg': 'Feedback for input 2'},
        { 'ok': 'Partial', 'msg': 'Feedback for input 3'}
        ... ] }
마지막 형태는 복수의 응답 필드를 포함하는 응답에 유용하다. 이를 통해 각 응답 필드에 개별적으로 피드백을 제공할 수 있으며 전체 응답에 적용될 메시지를 제공할 수 있다.
8.46.3.2. 스크립트 태그 예제
다음 예제에서 <customresponse> 태그는 스크립트 태그 내 test_add_to_ten 와 test_add 기능을 나타낸다.
Python은 들여쓰기를 준수한다. <script> 태그 내부의 스크립트는 반드시 들여쓰기 없이 시작해야 한다.
<problem>

<script type="loncapa/python">

def test_add(expect, ans):
    try:
        a1=int(ans[0])
        a2=int(ans[1])
        return (a1+a2) == int(expect)
    except ValueError:
        return False

def test_add_to_ten(expect, ans):
    return test_add(10, ans)

</script>

<p>Enter two integers that sum to 10. </p>
<customresponse cfn="test_add_to_ten">
  <textline size="10"/><br/>
  <textline size="10"/>
</customresponse>

<p>Enter two integers that sum to 20: </p>
<customresponse cfn="test_add" expect="20">
  <textline size="40" correct_answer="11" label="Integer #1"/><br/>
  <textline size="40" correct_answer="9" label="Integer #2"/>
</customresponse>

<solution>
  <div class="detailed-solution">
    <p>Explanation</p>
    <p>Any set of integers on the line \(y = 10 - x\) and \(y = 20 - x\)
       satisfies these constraints.</p>
    <p>You can also add images within the solution clause, like so:</p>
    <img src="/static/images/placeholder-image.png"/>
  </div>
</solution>

</problem>
8.46.3.3. 라이브러리 리턴 check 함수 예제
다음 예제는 라이브러리를 다시 되돌리는 check 함수를 보여준다.
def check(expect, answer_given):
    check1 = (int(answer_given[0]) == 1)
    check2 = (int(answer_given[1]) == 2)
    check3 = (int(answer_given[2]) == 3)
    return {'overall_message': 'Overall message',
                'input_list': [
                    { 'ok': check1, 'msg': 'Feedback 1'},
                    { 'ok': check2, 'msg': 'Feedback 2'},
                    { 'ok': check3, 'msg': 'Feedback 3'} ] }
이 함수는 사용자가 첫 번째 입력으로 1 을, 두 번째 입력으로 2 를, 세 번째 입력으로 3 을 기입했다는 사실을 확인한다. 각 개별 입력에 대한 피드백 메시지와 전체 문제 아래에 표시되는 메시지를 제공한다.
8.46.3.4. 스크립트 태그 속성
다음 표는 이전 예제의 주요 속성 및 값에 대한 설명이다.
<script type="loncapa/python"> |
문제가 Python 스크립트를 포함하는 것을 나타낸다. |
<customresponse cfn="test_add_to_ten"> |
학습자가 문제 답안을 확인할 때 test_add_to_ten 함수를 사용한다는 것을 나타낸다. |
<customresponse cfn="test_add" expect="20"> |
학습자가 이 문제 답변을 확인하고 예상 답이 20일 때 test_add 함수를 사용한다는 것을 나타낸다. |
| <textline size=”10” correct_answer=”3”/> | 태그가 size, correct_answer, 와 label 속성을 포함한다. correct_answer 속성은 선택사항이다. |
8.46.3.5. 스크립트 태그 포맷으로 맞춤형 Python 평가 입력 문제 생성하기
<script> 태그를 이용하여 맞춤형 Python 평가 입력 문제를 생성하는 절차는 다음과 같다.
- 구성요소 편집기에서 필요한대로 예제를 수정한다.
- 저장 을 클릭한다.
문제 코드:
<problem>
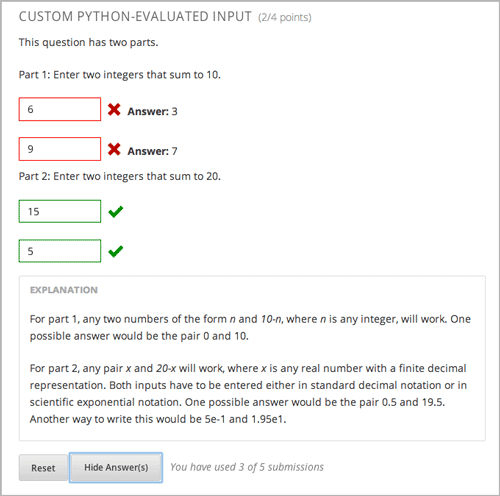
<p>This question has two parts.</p>
<script type="loncapa/python">
def test_add(expect, ans):
try:
a1=int(ans[0])
a2=int(ans[1])
return (a1+a2) == int(expect)
except ValueError:
return False
def test_add_to_ten(expect, ans):
return test_add(10, ans)
</script>
<p>Part 1: Enter two integers that sum to 10. </p>
<customresponse cfn="test_add_to_ten">
<textline size="10" correct_answer="3" label="Integer #1"/><br/>
<textline size="10" correct_answer="7" label="Integer #2"/>
</customresponse>
<p>Part 2: Enter two integers that sum to 20. </p>
<customresponse cfn="test_add" expect="20">
<textline size="10" label="Integer #1"/><br/>
<textline size="10" label="Integer #2"/>
</customresponse>
<solution>
<div class="detailed-solution">
<p>Explanation</p>
<p>For part 1, any two numbers of the form <i>n</i> and <i>10-n</i>,
where <i>n</i> is any integer, will work. One possible answer would
be the pair 0 and 10.</p>
<p>For part 2, any pair <i>x</i> and <i>20-x</i> will work, where <i>
x</i> is any real number with a finite decimal representation. Both
numbers have to be entered either in standard decimal notation or in
scientific exponential notation. One possible answer would be the
pair 0.5 and 19.5. Another way to write this would be 5e-1 and 1.95e1.</p>
</div>
</solution>
</problem>
템플릿
다음 템플릿은 학습자가 정답 보기(Show Answer) 를 클릭하면 표시되는 정답을 포함하고 있다.
<problem>

<script type="loncapa/python">
def test_add(expect,ans):
  a1=float(ans[0])
  a2=float(ans[1])
  return (a1+a2)== float(expect)
</script>

<p>Problem text</p>
<customresponse cfn="test_add" expect="20">
        <textline size="10" correct_answer="11" label="Integer #1"/><br/>
        <textline size="10" correct_answer="9" label="Integer #2"/>
</customresponse>

    <solution>
        <div class="detailed-solution">
          <p>Solution or Explanation Heading</p>
          <p>Solution or explanation text</p>
        </div>
    </solution>
</problem>
다음 템플릿은 학습자가 정답 보기를 클릭해도 답을 되돌려 주지 않다. 그 문제가 학습자가 볼 수 있는 답을 포함하지 않는 문제일 경우 문제 구성요소에서 정답 보기(Show Answer) 를 아님(Never) 으로 설정한다.
<problem>

<script type="loncapa/python">
def test_add(expect,ans):
  a1=float(ans[0])
  a2=float(ans[1])
  return (a1+a2)== float(expect)
</script>

<p>Enter two real numbers that sum to 20: </p>
<customresponse cfn="test_add" expect="20">
        <textline size="10"  label="Integer #1"/><br/>
        <textline size="10"  label="Integer #2"/>
</customresponse>

    <solution>
        <div class="detailed-solution">
          <p>Solution or Explanation Heading</p>
          <p>Solution or explanation text</p>
        </div>
    </solution>
</problem>
8.46.3.6. 부분 점수 부여하기
맞춤형 Python 평가 입력 문제를 설정해 학습자가 문제에 대해 부분 점수를 획득할 수 있도록 할 수 있다. 문제 총점의 50%를 부여할 수도 있고 다른 %를 설정할 수도 있다. 자세한 사항은 다음과 같다.
8.46.3.6.1. 절반 점수 부여하기
총점의 50%를 부분 점수로 부여하도록 설정할 수 있다. 다른 점수를 부여하기 위해선 부분 점수 % 설정하기 를 참고하면 된다.
check 함수는 "Partial" 값을 다음 방법 중 한가지로 되돌려 놓아야 한다.
직접
"Partial"값을 되돌린다.라이브러리에
"Partial"값을 다음과 같은 형태로 되돌린다.{ 'ok': 'Partial', 'msg': 'Message' }다수-부분 문제의 입력 목록 일부로
"Partial"값을 되돌린다.{ 'overall_message': 'Overall message', 'input_list': [ { 'ok': True, 'msg': 'Feedback for input 1'}, { 'ok': False, 'msg': 'Feedback for input 2'}, { 'ok': 'Partial', 'msg': 'Feedback for input 3'} ... ] }
모든 옵션에서 True는 학습자에게 문제 총점의 100%를 부여하고 ‘Partial’은 50%, False는 0%를 부여한다.
Check 함수에 대한 자세한 사항은 Check 함수에 대한 자세한 사항은 check 함수 를 참고하면 된다.
8.46.3.6.2. 부분 점수 % 설정하기
일정 %를 부분 점수로 부여하도록 설정할 수 있다. 이 방법은 절반 점수 부여하기 에 비해 유연하게 학습자에게 점수를 줄 수 있다.
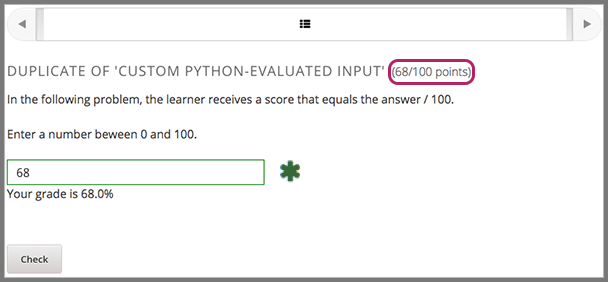
다음 예제에서 학습자의 성적은 정답을 100으로 나눈 숫자이다.
다음 코드는 문제의 설정을 나타낸다.
<problem>
<p>In the following problem, the learner receives a score that equals the
   answer / 100. If the learner's answer is greater than 100 or less than 0,
   the score equals 0.</p>

<script type="loncapa/python">

def give_partial_credit(expect, ans):
  ans = float(ans)
  if ans > 100 or ans < 0:
      # Assign a score of zero if the answer is less than zero or over 100.
      ans = 0
  grade = ans/100
  return {
      'input_list': [
         { 'ok': True, 'msg': 'Your grade is ' + str(ans) + '%', 'grade_decimal':grade},
      ]
  }
</script>

<p>Enter a number beween 0 and 100.</p>
<customresponse cfn="give_partial_credit">
  <textline points="100" size="40" label="Ans1"/><br/>
</customresponse>
</problem>
이 예제는 다음과 같은 점을 시사한다.
<customresponse>요소의points속성은 문제의 총점이 100점임을 의미한다.give_partial_credit함수는 정답이 0과 100 사이임을 나타내며 그렇다면 학습자들의 성적을 결정하기 위해 답을 100으로 나눈다.- 되돌려진
input_list는:- 답안이 점수를 받을 만 하다고 생각되면
'ok': True을 작성한다. 'msg': 'Your grade is ' + str(ans) + '%'형태로 학습자가 %가 함께 표시되는Your grade is메시지를 받는다.'grade_decimal':grade항목을 사용하면 학습자의 답안을 100으로 나눈 값이 점수가 된다.
- 답안이 점수를 받을 만 하다고 생각되면
부분 점수 문제에 이런 예제를 응용하여 직접 활용할 수 있다.
8.46.3.7. 무작위 맞춤형 Python 평가 입력 문제 생성하기
Python 코드에서 변수를 무작위 추출하는 맞춤형 Python 평가 입력 문제를 생성할 수 있다.
주석
문제 설정에서 반드시 무작위 추출(Randomization) 값을 아님(Never) 을 제외한 다른 값으로 지정함으로써 Python 변수를 무작위 추출할 수 있게 해야 한다. 문제 변수 무작위 설정 에서 보다 구체적인 정보를 확인한다.
Python 평가 입력 문제에서 무작위 추출을 시행하는 방법을 다음 예시에서 확인할 수 있다.
주석
아래의 예시는 random.randint 방법으로 무작위 수를 만든다. Python 표준 라이브러리를 사용한다.
<problem>
  <p>Some problems in the course will utilize randomized parameters.
     For such problems, after you check your answer you will have the option
     of resetting the question, which reconstructs the problem with a new
     set of parameters.</p>
<script type="loncapa/python">
x1 = random.randint(0, 100)
x2 = random.randint(0, 100)
y = x1+x2
</script>
<p>Let (x_1 = $x1) and (x_2 = $x2). What is the value of (x_1+x_2)?</p>
<numericalresponse answer="$y">
  <responseparam type="tolerance" default="0.01%" name="tol"
    description="Numerical Tolerance"/>
  <textline size="10"/>
</numericalresponse>
<solution>
  <p><b>Explanation:</b></p>
</solution>
</problem>